Difference between revisions of "Exercise - Building a Complex Component"
From Flowcode Help
Jump to navigationJump to searchJohnVerrill (talk | contribs) |
JohnVerrill (talk | contribs) |
||
| Line 8: | Line 8: | ||
* Locate the 'newLED' component, and use the down-arrow next to it to add it to the [[System Panel]]. | * Locate the 'newLED' component, and use the down-arrow next to it to add it to the [[System Panel]]. | ||
| + | |||
* Click on the LED to select it. Change the 'color' property to orange (e.g. 0x0080FF). | * Click on the LED to select it. Change the 'color' property to orange (e.g. 0x0080FF). | ||
| Line 13: | Line 14: | ||
* Using the Panel Properties, with the LED still selected, set its 'Position' to X=0, Y=0, Z=10, and its 'Scale' to 'Wi...'=1, 'He...'=1, 'De...'=0.25. | * Using the Panel Properties, with the LED still selected, set its 'Position' to X=0, Y=0, Z=10, and its 'Scale' to 'Wi...'=1, 'He...'=1, 'De...'=0.25. | ||
: The component should resemble the picture opposite, (depending on the 'camera' zoom.) | : The component should resemble the picture opposite, (depending on the 'camera' zoom.) | ||
| + | |||
| + | [[File:gen_exerciseBuildComplexComp_complex2_01.png|180px|right]] | ||
| + | |||
| + | |||
| + | |||
| + | |||
| + | |||
* Click on the head of the vertical arrow, (green), to rotate the camera to give an 'edge-on' view. | * Click on the head of the vertical arrow, (green), to rotate the camera to give an 'edge-on' view. | ||
| − | * The LED should still be selected. If not, click on it. Right-click and select the 'Copy' option. The right-click and select the 'Paste' option. A second identical LED appears. | + | * The LED should still be selected. If not, click on it. Right-click and select the 'Copy' option. The right-click and select the 'Paste' option. |
| + | : A second identical LED appears. | ||
* Set its 'Position' co-ordinates to X=0, Y=0, Z=-10. The System panel should now resemble the one shown opposite: | * Set its 'Position' co-ordinates to X=0, Y=0, Z=-10. The System panel should now resemble the one shown opposite: | ||
Revision as of 15:08, 24 May 2013
- Open a new Flowcode flowchart.
- Ensure that the System Panel is visible. If not use the View menu.
- The following assumes that you have built, and exported a LED component, as described in Exercise - Create a LED component and Exercise - Exporting the LED component.
- Open the 'Outputs' toolbox, where you stored the exported 'newLED' component.
- Locate the 'newLED' component, and use the down-arrow next to it to add it to the System Panel.
- Click on the LED to select it. Change the 'color' property to orange (e.g. 0x0080FF).
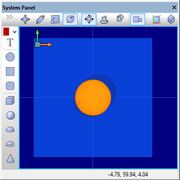
- Using the Panel Properties, with the LED still selected, set its 'Position' to X=0, Y=0, Z=10, and its 'Scale' to 'Wi...'=1, 'He...'=1, 'De...'=0.25.
- The component should resemble the picture opposite, (depending on the 'camera' zoom.)
- Click on the head of the vertical arrow, (green), to rotate the camera to give an 'edge-on' view.
- The LED should still be selected. If not, click on it. Right-click and select the 'Copy' option. The right-click and select the 'Paste' option.
- A second identical LED appears.
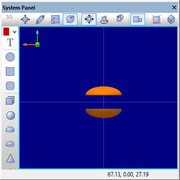
- Set its 'Position' co-ordinates to X=0, Y=0, Z=-10. The System panel should now resemble the one shown opposite:

