Difference between revisions of "Camera Control"
| (16 intermediate revisions by 3 users not shown) | |||
| Line 1: | Line 1: | ||
| − | <sidebar>Sidebar: | + | <sidebar>Sidebar: Flowcode Help Overview:Panels</sidebar> |
| − | |||
| − | + | There are two methods in which you can interact with the simulation panel; Camera and Cursor mode. It is a dynamic menu, and selecting the ‘Arrow’ icon [[File:CursorModeIcon.png]] will change the functionality of the three icons to its right. | |
| − | + | <gallery widths=190x50px perrow=2 caption="Interaction Methods" style="margin:auto; text-align:center;"> | |
| − | + | File:SystemPanelCameraControl2.png|'''Camera Mode''' | |
| − | + | File:SystemPanelCursorControl.png|'''Cursor Mode''' | |
| − | |||
| − | <gallery widths= | ||
| − | File: | ||
| − | File: | ||
| − | |||
</gallery> | </gallery> | ||
| − | |||
| − | |||
| − | |||
| − | + | '''Camera Mode''' | |
| + | You can pan (1), rotate (2) and zoom (3) the camera. To pan and rotate, hold the left mouse button and drag. To zoom, drag a box to the required size or use the mouse wheel to zoom in/ out. You can also zoom in/ out by scrolling the mouse wheel. | ||
| − | |||
| − | |||
| − | + | '''Cursor Mode''' | |
| − | + | Cursor Mode allows you to move (1), rotate (2) and scale (3) objects. When a shape is selected in cursor mode you will notice a set of ‘local’ axes appear on your shape. To ‘free move’ the object in the panel, left click and hold the object and drag. Alternatively, if you want to move your object along a constrained axis, left mouse click on these local axes and drag. Note; rotate and scale work in a similar way. | |
| − | |||
| − | |||
| − | |||
| − | |||
| − | |||
| − | |||
| − | |||
| − | |||
| − | |||
| − | |||
| − | |||
| − | |||
| − | |||
| − | |||
| − | |||
| − | |||
=== Axis alignment === | === Axis alignment === | ||
| Line 58: | Line 32: | ||
:First of all, move the cursor to the desired position, to find its coordinates. Then enter these into the 'Position' [[Component Properties|properties]] of the object in the [[Properties Panel]]. | :First of all, move the cursor to the desired position, to find its coordinates. Then enter these into the 'Position' [[Component Properties|properties]] of the object in the [[Properties Panel]]. | ||
| + | |||
| + | |||
| + | ===Video instructions=== | ||
| + | ''Note, the videos below are for Flowcode v6, however there are similarities so watching is still advised.'' | ||
| + | |||
| + | |||
| + | See the following Youtube videos to learn how to effectively control the camera and navigate the panels: | ||
| + | |||
| + | The [http://www.youtube.com/watch?v=CERJCvyInV8&list=PLQDWBb7bxuCgg6aJgPJcfXBMzZdLILceQ Camera Control 1] video covers the basic camera controls and camera rotation and general camera manipulation. | ||
| + | |||
| + | The [http://www.youtube.com/watch?v=uG20xwQtcCM&list=PLQDWBb7bxuCgg6aJgPJcfXBMzZdLILceQ Camera Control 2] video covers slightly more advanced features such as using keyboard shortcuts as well as mouse movement to navigate the panel more effectively. | ||
| + | |||
| + | {| style="margin:auto;" | ||
| + | |- | ||
| + | |{{#ev:youtube|CERJCvyInV8}} | ||
| + | | width="100px" | | ||
| + | |{{#ev:youtube|uG20xwQtcCM}} | ||
| + | |} | ||
Latest revision as of 10:24, 6 July 2016
<sidebar>Sidebar: Flowcode Help Overview:Panels</sidebar>
There are two methods in which you can interact with the simulation panel; Camera and Cursor mode. It is a dynamic menu, and selecting the ‘Arrow’ icon ![]() will change the functionality of the three icons to its right.
will change the functionality of the three icons to its right.
- Interaction Methods
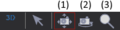
Camera Mode
Cursor Mode
Camera Mode You can pan (1), rotate (2) and zoom (3) the camera. To pan and rotate, hold the left mouse button and drag. To zoom, drag a box to the required size or use the mouse wheel to zoom in/ out. You can also zoom in/ out by scrolling the mouse wheel.
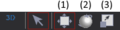
Cursor Mode
Cursor Mode allows you to move (1), rotate (2) and scale (3) objects. When a shape is selected in cursor mode you will notice a set of ‘local’ axes appear on your shape. To ‘free move’ the object in the panel, left click and hold the object and drag. Alternatively, if you want to move your object along a constrained axis, left mouse click on these local axes and drag. Note; rotate and scale work in a similar way.
Axis alignment
The coloured arrows in the top left corner of the panel show the orientation of the camera. You can click any of these arrows to reset the view to look in that axis.
For example, clicking on the blue arrow gives a top-down view – looking down the ‘Z’ axis. Clicking on one of the other coloured arrows rotates the object about that axis.
![]() You can use the 'Align Axis' button to mirror the axis of the selected object, this follows the alignment of the component axis, even when being manipulated and rotated.
You can use the 'Align Axis' button to mirror the axis of the selected object, this follows the alignment of the component axis, even when being manipulated and rotated.
Hint:
- The coordinates of the cursor are shown in the status bar at the bottom of the screen. Using this information can help you to position objects.
- First of all, move the cursor to the desired position, to find its coordinates. Then enter these into the 'Position' properties of the object in the Properties Panel.
Video instructions
Note, the videos below are for Flowcode v6, however there are similarities so watching is still advised.
See the following Youtube videos to learn how to effectively control the camera and navigate the panels:
The Camera Control 1 video covers the basic camera controls and camera rotation and general camera manipulation.
The Camera Control 2 video covers slightly more advanced features such as using keyboard shortcuts as well as mouse movement to navigate the panel more effectively.
| CERJCvyInV8}} | uG20xwQtcCM}} |