Exercise - Building a Complex Component
From Flowcode Help
Revision as of 13:59, 1 September 2013 by JohnVerrill (talk | contribs)
<sidebar>Sidebar: Component Exercises</sidebar> This exercise shows how to create a traffic cone with a double flashing lamp, using the 'newLED' component. The settings and dimensions given are found by trial-and-error, or by using the cursor and cursor position settings shown at the bottom of the System Panel.
Contents
Setting up the LED component
- Ensure that the System Panel is visible. If not use the View menu.
- The following assumes that you have built, and exported a LED component, as described in Exercise - Create an LED Component and Exercise - Exporting the LED Component.

- Open the 'Outputs' toolbox, where you stored the exported 'newLED' component.
- Locate the 'newLED' component, and use the down-arrow next to it to add it to the System Panel.
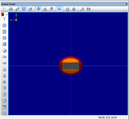
- Click on the LED to select it. Change the 'color' property to orange (e.g. 0x0080FF).
- Using the Panel Properties, with the LED still selected, set its 'Position' to X=0, Y=0, Z=10, and its 'Scale' to 'Wi...'=1, 'He...'=1, 'De...'=0.25.
- The component should resemble the picture opposite, (depending on the 'camera' zoom.)
Adding the second LED

- Click on the head of the vertical arrow, (green), to rotate the camera to give an 'edge-on' view.
- The LED should still be selected. If not, click on it. Right-click and select the 'Copy' option. Then right-click and select the 'Paste' option.
- A second identical LED appears.
- Set its 'Position' co-ordinates to X=0, Y=0, Z=-10, and the 'Rotation' settings to X=0, Y=180, Z=0.
- The System panel should now resemble the one shown opposite:
Mounting the LEDs

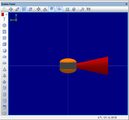
- Drag and drop a cube onto the System Panel.
- Select it, and set its 'Position' co-ordinates to X=0, Y=0, Z=0, and 'Scale' to 'Wi...'=32, 'He...'=12, 'De...'=32.
- Change its 'color' property to mid-grey (e.g. 0x5A5A5A).
- The System Panel looks like the one opposite:
Building the traffic cone
- Drag across all three shapes and group them by clicking on the 'Group' icon.

- Notice that the 'Component Handle' and 'Type' have changed to 'Group'. Rename the 'Handle' as "flasher".
- Click on the head of the vertical arrow, (blue), to rotate the camera back to the 'head-on' view.
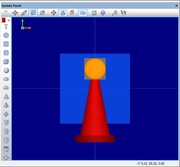
- Drag and drop a cone onto System Panel.
- Select it, and set its 'Position' co-ordinates to X=0, Y=-12, Z=0, 'Scale' to 'Wi...'=45, 'He...'=45, 'De...'=120 and 'Rotation' to X=-90, Y=0, Z=0.
- Change its 'color' to red (e.g. 0x0000C0).
- View it from different 'camera' directions by clicking on the heads of the red, green and blue arrows. It should resemble the picture shown below:
- Three views


- Revert to the original (left-hand side) view.
- Drag and drop a cylinder onto the System Panel.
- Give it the following settings:
- 'Position' - X=0, Y=-75, Z=0;
- 'Scale' -'Wi...'=60, 'He...'=60, 'De...'=10;
- 'Rotation' - X=-90, Y=0, Z=0.
- Change its 'color' to dark red (e.g. 0x000080).
The completed traffic cone
- Drag across all three shapes and group them by clicking on the 'Group' icon.
- The System Panel now looks like this:
- The System Panel now looks like this:

Adding an interface
The next task is to make the cone do something - flash on and off.
- Click on 'Macro' and then 'New' to create a new macro.
- In the 'Create a New Macro dialogue box, name the new macro "flash" and click on 'OK'.
- On the 'flash' macro workspace:
- add an infinite loop, and inside the loop:
- drag and drop a 'Simulation macro' icon;
- double click on it. Rename it "Switch on". Click on the 'Simulation' tab, and on one of the 'LEDon' labels and click on 'OK'.
- drag and drop a 'Delay' icon.
- double click on it. Change its name to "One second delay". Change the units to 'seconds' and click on 'OK'.
- drag and drop a second 'Simulation macro' icon;
- double click on it. Rename it "Switch off". Click on the 'Simulation' tab, and on one of the 'LEDoff' labels and click on 'OK'.
- drag and drop a second 'Delay' icon, and configure it exactly as before.
The 'flash' flowchart now resembles the one shown below:


- In the 'Main' part of the flowchart, drag and drop a 'Macro' icon.
- Double click on it and then click on the 'flash' label.
- Test the component by simulating the program.
- See the Exercise - Simulating a Program
What next?
- The traffic cone component can now be exported in the usual way. (See Exporting the Traffic Cone.)
Link
To download the Flowcode program for this exercise, click on the following link xxx