Difference between revisions of "Exercise - Inserting Code Into Flowcode"
JohnVerrill (talk | contribs) |
|||
| (44 intermediate revisions by 3 users not shown) | |||
| Line 1: | Line 1: | ||
| − | <sidebar>Sidebar: | + | <sidebar>Sidebar: Flowcode Exercises:Ex1</sidebar> |
| − | C code is a high-level programming language widely used in industry.It has spawned a number of other programming languages, such as C#, C++, Java and Python. | + | C code is a high-level programming language widely used in industry.<br /> |
| + | It has spawned a number of other programming languages, such as C#, C++, Java and Python. | ||
Flowcode programs are first compiled into C before being crunched down eventually into hex code. | Flowcode programs are first compiled into C before being crunched down eventually into hex code. | ||
| + | |||
There are two mechanisms for adding your own C code to a Flowcode flowchart: | There are two mechanisms for adding your own C code to a Flowcode flowchart: | ||
[[File:Exercise_InsCode_C_suppcode.jpg|right|350px]] | [[File:Exercise_InsCode_C_suppcode.jpg|right|350px]] | ||
| − | * using the 'C Code' icon [[File:Btn C Code.gif| | + | * using the 'C Code' icon [[File:Btn C Code.gif|border]] ; |
| − | * using the 'Use supplementary code' facility within 'Project Options': | + | * using the 'Use supplementary code' facility within 'Project Options', shown opposite: |
| + | |||
| + | __TOC__ | ||
| + | ==Why would you want to?== | ||
| − | + | * Flowcode programs are compiled to 'C', but produce many lines of code. | |
| + | : They do so because they must be able to cope with any function or structure that the designer wishes to use. | ||
| + | : Experienced C programmers may wish to use code more efficiently, and so insert a few lines of code to replace many lines which Flowcode would generate. (This usually applies to the 'Adding supplementary code' option.) | ||
| + | * Experienced programmers can insert a short section of C code in order to reduce the length, or complexity, of the Flowcode program. | ||
| − | + | * Students learning to program in C can test short sections of code by inserting them into a Flowcode program. This avoids having to write the full program in C. | |
| − | |||
| + | ==Adding supplementary code== | ||
| − | + | This feature is used when you have blocks of code containing routines, definitions, lookup tables, etc. | |
| + | [[File:Gen_Supplementary_Code_01.png|right|frameless]] | ||
| + | '''Definitions and function declarations:''' | ||
| − | + | This is the first section. It allows users to initialise the program, by adding structures such as 'defines', 'includes', and other function declarations. This section must be placed at the beginning of the C file so that the code is 'visible' to all parts of the program. | |
| + | '''Function implementations:''' | ||
| − | + | This second section allows for the addition of the main function code. | |
| − | |||
| − | + | Structured thus, the code is accessible to any Flowcode macro, and vice-versa. | |
| − | |||
| − | + | ==Warning== | |
| − | + | Be sure that the added C code is correct! <br /> | |
| − | + | Flowcode does not simulate C Code, so programs that make use of supplementary code may not simulate correctly. | |
| + | Where Flowcode fails to compile, it may be that the supplementary code contains errors. | ||
| − | |||
| − | |||
| − | + | ==Using the 'Code' icon== | |
| + | [[File:Exercise_InsCode_C_Flowchart.png|right|294x261px]] | ||
| − | |||
* [[Opening Flowcode|Open Flowcode]]. | * [[Opening Flowcode|Open Flowcode]]. | ||
| + | |||
* On the Startup screen, click on 'New project' to [[Creating Flowcharts|create a new flowchart]]. | * On the Startup screen, click on 'New project' to [[Creating Flowcharts|create a new flowchart]]. | ||
| − | |||
| − | |||
| − | |||
| − | |||
| − | |||
| − | + | * Add the icons shown in the flowchart: | |
| + | ::* a loop icon, configured as an infinite loop; | ||
| + | ::* a calculation icon: | ||
| + | :::* use it to create two byte variables, 'var1' and 'add', | ||
| + | :::* set them to the following values: | ||
| + | ::::: var1 = 2, add = 3; | ||
| + | ::* a Code icon [[File:Btn C Code.gif|border]]- details given below; | ||
| + | ::* a delay icon configured to give a two second delay. | ||
| − | + | ==The C Code== | |
| + | Configure the Code icon by typing in the following code, exactly as written here: | ||
| + | <pre class="brush:[cpp]" style="float:left;"> | ||
| + | trisb = 0; //Set all of Port B to output | ||
| + | portb = FCV_VAR1; //Output the value of var1 to port B | ||
| + | trisa = 1; //Convert port A bit 0 to input | ||
| + | if (test_bit(porta,0)) //Check to see if A0 is highelse</pre> | ||
| − | + | The 'Code' icon properties box resembles that shown opposite. | |
| − | + | [[File:Exercise_InsCode_C_Code_Properties.png|center]] | |
| − | |||
| − | |||
| − | |||
| − | The | + | The software recognizes instructions and comments, and colour-codes them accordingly. |
| − | + | '''Some notes on this code:''' | |
| − | + | * The ports on the PIC chip are bi-directional - they can act as either input or output. | |
| − | + | * Their behaviour is controlled by the contents of two more registers - TRISA (for Port A) and TRISB (for Port B.) | |
| − | ::* | + | :* A value of '0' in the control register makes the corresponding bit of the port into an output bit. |
| + | :* A value of '1' in the control register makes the corresponding bit of the port into an input bit. | ||
| + | * Commands are finished by adding a semicolon (;). | ||
| + | * The characters '//' are used to indicate comments - there to aid understanding of the program. These are ignored by the compiler. | ||
| + | * Where variables are defined in the Flowcode program, the prefix 'FCV_' must be added to the name of the variable, which is written in upper case lettering. | ||
| + | * The 'if-else' construction examines a possible condition - "Is Port A bit 0 high?" | ||
| + | :* If true, the values of the two variables are added together and sent to Port B. | ||
| + | :* If false, only the value of 'var1' is sent to Port B. | ||
| − | + | * All of this could have been done using 'pure' Flowcode, but it would have required around five more icons in the flowchart. | |
| − | |||
| − | == | + | ==Testing== |
| − | + | As pointed out earlier, Flowcode will not simulate added C code, and so there is no value in simulating this program.<br /> | |
| − | + | Instead, compile it to the PIC chip which you specified as the target. | |
| − | |||
| − | |||
| − | |||
| − | |||
| − | + | Add the following E-Blocks units to the EB-008 Multiprogrammer holding the PIC chip: | |
| + | :: a switch unit to Port A, | ||
| + | :: a LED unit to Port B. | ||
| + | Press the reset switch on the Multiprogrammer. | ||
| − | |||
| − | + | Test the program by noticing the output displayed on the LEDs when switch 0 on the switch unit is pressed. | |
| + | * When pressed, LEDs D2 and D0 should light, indicating an output 0101 (i.e. the number 5,) | ||
| + | * When not pressed, LED D1 should light, indicating an output 0010, (i.e. the number 2.) | ||
| − | |||
| − | + | ==Download the exercise== | |
| + | You can download the file created by this exercise and open it in Flowcode to identify errors in your program/file or you could also download the file to skip to the next exercise. | ||
| − | * | + | *To download the file, click on the link below and then either: |
| + | :*Click on the file name. | ||
| + | :*Right click the file name and select 'Save link as...' or 'Save target as...' (depending on your browser). | ||
| − | + | :::{{Fcfile|Exercise - Inserting Code Into Flowcode.fcfx|Exercise - Inserting Code Into Flowcode}} | |
Latest revision as of 14:32, 13 March 2014
<sidebar>Sidebar: Flowcode Exercises:Ex1</sidebar>
C code is a high-level programming language widely used in industry.
It has spawned a number of other programming languages, such as C#, C++, Java and Python.
Flowcode programs are first compiled into C before being crunched down eventually into hex code.
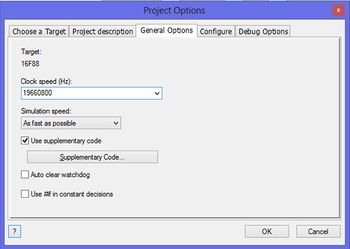
There are two mechanisms for adding your own C code to a Flowcode flowchart:
- using the 'C Code' icon
 ;
; - using the 'Use supplementary code' facility within 'Project Options', shown opposite:
Contents
Why would you want to?
- Flowcode programs are compiled to 'C', but produce many lines of code.
- They do so because they must be able to cope with any function or structure that the designer wishes to use.
- Experienced C programmers may wish to use code more efficiently, and so insert a few lines of code to replace many lines which Flowcode would generate. (This usually applies to the 'Adding supplementary code' option.)
- Experienced programmers can insert a short section of C code in order to reduce the length, or complexity, of the Flowcode program.
- Students learning to program in C can test short sections of code by inserting them into a Flowcode program. This avoids having to write the full program in C.
Adding supplementary code
This feature is used when you have blocks of code containing routines, definitions, lookup tables, etc.
Definitions and function declarations:
This is the first section. It allows users to initialise the program, by adding structures such as 'defines', 'includes', and other function declarations. This section must be placed at the beginning of the C file so that the code is 'visible' to all parts of the program.
Function implementations:
This second section allows for the addition of the main function code.
Structured thus, the code is accessible to any Flowcode macro, and vice-versa.
Warning
Be sure that the added C code is correct!
Flowcode does not simulate C Code, so programs that make use of supplementary code may not simulate correctly. Where Flowcode fails to compile, it may be that the supplementary code contains errors.
Using the 'Code' icon
- On the Startup screen, click on 'New project' to create a new flowchart.
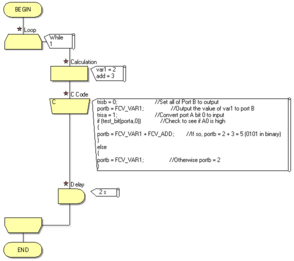
- Add the icons shown in the flowchart:
The C Code
Configure the Code icon by typing in the following code, exactly as written here:
trisb = 0;                         //Set all of Port B to output
portb = FCV_VAR1;                  //Output the value of var1 to port B
trisa = 1;                         //Convert port A bit 0 to input
if (test_bit(porta,0))             //Check to see if A0 is highelse
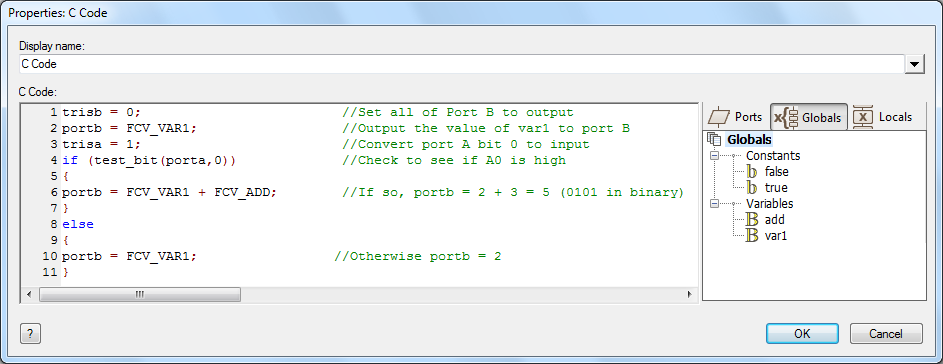
The 'Code' icon properties box resembles that shown opposite.
The software recognizes instructions and comments, and colour-codes them accordingly.
Some notes on this code:
- The ports on the PIC chip are bi-directional - they can act as either input or output.
- Their behaviour is controlled by the contents of two more registers - TRISA (for Port A) and TRISB (for Port B.)
- A value of '0' in the control register makes the corresponding bit of the port into an output bit.
- A value of '1' in the control register makes the corresponding bit of the port into an input bit.
- Commands are finished by adding a semicolon (;).
- The characters '//' are used to indicate comments - there to aid understanding of the program. These are ignored by the compiler.
- Where variables are defined in the Flowcode program, the prefix 'FCV_' must be added to the name of the variable, which is written in upper case lettering.
- The 'if-else' construction examines a possible condition - "Is Port A bit 0 high?"
- If true, the values of the two variables are added together and sent to Port B.
- If false, only the value of 'var1' is sent to Port B.
- All of this could have been done using 'pure' Flowcode, but it would have required around five more icons in the flowchart.
Testing
As pointed out earlier, Flowcode will not simulate added C code, and so there is no value in simulating this program.
Instead, compile it to the PIC chip which you specified as the target.
Add the following E-Blocks units to the EB-008 Multiprogrammer holding the PIC chip:
- a switch unit to Port A,
- a LED unit to Port B.
Press the reset switch on the Multiprogrammer.
Test the program by noticing the output displayed on the LEDs when switch 0 on the switch unit is pressed.
- When pressed, LEDs D2 and D0 should light, indicating an output 0101 (i.e. the number 5,)
- When not pressed, LED D1 should light, indicating an output 0010, (i.e. the number 2.)
Download the exercise
You can download the file created by this exercise and open it in Flowcode to identify errors in your program/file or you could also download the file to skip to the next exercise.
- To download the file, click on the link below and then either:
- Click on the file name.
- Right click the file name and select 'Save link as...' or 'Save target as...' (depending on your browser).


