The first step is to ensure that you have installed the Arduino drivers for your USB device, these are available from the Arduino site. Once you have installed the USB drivers the device should appear within your Windows device manager.
To access device manager:
Control Panel >> System >> Device Manager
The Arduino device should be listed under the “Ports (COM & LPT)” heading within Device Manager.
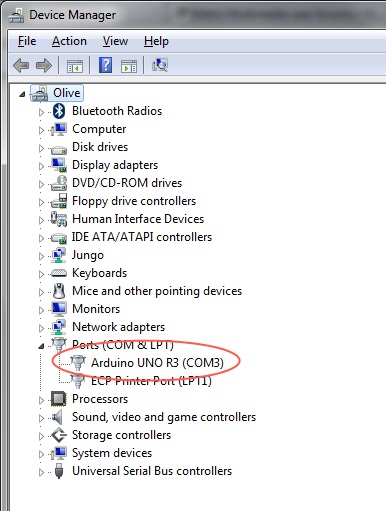
If the device is not listed it may not be connected correctly or the drivers may not be installed. Please check connections and drivers if you do not see the device in the list.
At this point you should note down the COM port that the Arduino is connected to in the above example this is COM port 3… COM3.
***IMPORTANT NOTE***
There has been reports that the ATMEL AVRDUDE program does not handle COM ports over COM9 very well, if the COM port your Arduino device is assigned is over COM9 then you need to un-assign a lower COM port.
- It may not work if you manually assign a COM port, you may have to assign a lower COM port, scan for hardware changes, then uninstall the device and then reinstall allowing Windows to assign a COM port below 9.
- Sometimes if a COM port is changed it is locked out and may require a computer reboot if a COM port is changed – be aware of this.
********************
After Windows has assigned an appropriate COM port, we can now determine the other settings required for the programmer settings.
The zip file below contains a text document which will tell you the other two settings that are required depending on the target Arduino board, the programmer and the speed.
https://www.matrixtsl.com/resources/getresource.php?id=889
Once we have the required settings we need to update our batch and avrdude programmer files.
Download the zip file below and extract the contents into the appropriate folders:
https://www.matrixtsl.com/resources/getresource.php?id=890
********************************************************************
avrdude.exe
avrdude.conf
These files need to go to the following directory:
(32bit) C:\Program Files\Flowcode(AVR)\v5\Tools\AVRDUDEusb
(64bit) C:\Program Files (x86)\Flowcode(AVR)\v5\Tools\AVRDUDEusb
Files with these names already exist in this directory, it is advised that you rename them or put them in an “old” directory and NOT copy over them in case there are issues with other chips.
********************************************************************
avrc_arduinoA.bat
This file needs to go to the following directory:
(32bit) C:\Program Files\Flowcode(AVR)\v5\Tools\MX_bats
(64bit) C:\Program Files (x86)\Flowcode(AVR)\v5\Tools\MX_bats
********************************************************************
With these files in the correct place we now need to change the compiler options to represent the Arduino we are using.

Red Circle: changed compiler options to point to new batch file
Orange Circle: Change to ‘programmer’ value obtained from text file
Blue Circle: Change to COM port that device is attached to
Green Circle: Change to ‘speed’ value obtained from text file
Now when you click compiler your Arduino should program correctly!
If your Arduino programming is still not working, and is simply ending at the programming stage within Flowcode, then please proceed to continue reading.
The AVRDude program requires the libusb0.dll to work, and to give it access to this dll is a very simple task.
Simply download the libusb0.dll within the zip file below:
https://www.matrixtsl.com/resources/getresource.php?id=891
Then place the libusb0.dll in the following directory:
(32bit) C:\Program Files\Flowcode(AVR)\v5\Tools\AVRDUDEusb
(64bit) C:\Program Files (x86)\Flowcode(AVR)\v5\Tools\AVRDUDEusb
This is the same directory as the avrdude.exe file that was replaced in the previous post.
Hopefully this should allow you to program your Arduino, any further problems please contact technical support here